Centos6安装Nextcloud10
新建用户:
useradd nextcloud -s /sbin/nologin准备工作
yum install -y telnet wget lrzsz -y
service iptables stop #防火墙记得关先
1、安装nginx
1.1安装openssl(可选)
1.2安装nginx
1.2.1上传包到/root目录下
nginx-1.6.1.tar.gz
nginx-sticky-module-1.1.tar.gz
openssl-1.0.2l.tar.gz
#解压包
tar -zxvf nginx-1.6.1.tar.gz
tar -zxvf nginx-sticky-module-1.1.tar.gz
tar -zxvf openssl-1.0.2l.tar.gz
1.2.2安装依赖
yum install -y zlib zlib-devel pcre gcc pcre-devel 1.2.3编译安装
cd nginx-1.6.1

./configure --prefix=/usr/local/nginx --with-openssl=/root/openssl-1.0.2l/ --with-http_ssl_module --add-module=/root/nginx-sticky-module-1.1
make && make install
1.2.4修改nginx.conf文件
user  nextcloud;
#user  nobody;
worker_processes  1;

#error_log  logs/error.log;
#error_log  logs/error.log  notice;
#error_log  logs/error.log  info;

#pid        logs/nginx.pid;


events {
    worker_connections  1024;
}


http {
    include       mime.types;
    include      gzip.conf;
    default_type  application/octet-stream;
    sendfile        on;
    #client_max_body_size        20;
    #client_body_timeout           500m;
    proxy_connect_timeout         60s;
    proxy_read_timeout            3m;
    proxy_send_timeout            3m;
    keepalive_timeout  30;
    reset_timedout_connection on;
    send_timeout 60;
    fastcgi_buffers 8 128k;
    server_tokens off;
    tcp_nopush on;
    tcp_nodelay on;

    upstream php-handler {
                server 127.0.0.1:9000;
    }

    include nextcloud.conf;
}
1.2.5添加gzip.conf
vi gzip.conf
gzip on;
gzip_http_version 1.1;
gzip_disable      "MSIE [1-6]\.";
gzip_disable      "Mozilla/4";
gzip_comp_level   5;#压缩级别,1压缩比最小处理速度最快,9压缩比最大但处理最慢,同时也最消耗CPU,一般设置为3
gzip_proxied      any;
gzip_vary        on;
gzip_buffers      4 16k;
gzip_min_length  1024;
gzip_types       text/plain text/xml text/css  application/xml application/xhtml+xml application/rss+xml application/atom_xml application/javascript application/x-javascript;
1.2.6添加nextcloud配置文件
server {
        listen 80;
        server_name cloud.rui.cn;
        server_name 192.168.15.173;
        #return 301 https://$server_name$request_uri;
        #server {listen 443 ssl;server_name cloud.nextcloud.com;
        #ssl_certificate /usr/local/data/nginx/conf/nextcloud.crt;
        #ssl_certificate_key /usr/local/data/nginx/conf/nextcloud.key;
        #添加如下header主要为了安全
        #add_header Strict-Transport-Security "max-age=15768000;includeSubDomains; preload;";add_header X-Content-Type-Options nosniff;add_header X-Frame-Options "SAMEORIGIN";add_header X-XSS-Protection "1; mode=block";add_header X-Robots-Tag none;add_header X-Download-Options noopen;add_header X-Permitted-Cross-Domain-Policies none;
        #nextcloud代码目录
        root /data/nextcloud/;
        location = /robots.txt {
                allow all;
                log_not_found off;
                access_log off;
        }
        #为了支持user_webfinger app
        rewrite ^/.well-known/host-meta /public.php?service=host-meta last;
        rewrite ^/.well-known/host-meta.json /public.php?service=host-meta-json last;
        #这儿是为了支持日历和联系人,建议加上
        location = /.well-known/carddav {
                return 301 $scheme://$host/remote.php/dav;
        }

        location = /.well-known/caldav {
                return 301 $scheme://$host/remote.php/dav;
        }

        #设置上传文件的最大大小,php也得修改
        client_max_body_size 512M;
        fastcgi_buffers 64 4K;
        # Disable gzip to avoid the removal of the ETag headergzip off;
        error_page 403 /core/templates/403.php;
        error_page 404 /core/templates/404.php;

        #重要的:将所有请求转发到index.php上
        location / {
        rewrite ^ /index.php$uri;
        }

        #安全设置,禁止访问部分敏感内容
        location ~ ^/(?:build|tests|config|lib|3rdparty|templates|data)/ {
                deny all;}
        location ~ ^/(?:\.|autotest|occ|issue|indie|db_|console) {
                deny all;
        }
        location ~ ^/(?:index|remote|public|cron|core/ajax/update|status|ocs/v[12]|updater/.+|ocs-provider/.+|core/templates/40[34])\.php(?:$|/) {
                include fastcgi_params;
                fastcgi_split_path_info ^(.+\.php)(/.*)$;
                fastcgi_param SCRIPT_FILENAME $document_root$fastcgi_script_name;
                fastcgi_param PATH_INFO $fastcgi_path_info;
                #fastcgi_param HTTPS on;
                #Avoid sending the security headers twicefastcgi_param modHeadersAvailable true;
                fastcgi_param front_controller_active true;
                fastcgi_pass php-handler;
                fastcgi_intercept_errors on;
                #fastcgi_request_buffering off;
        }
        #安全设置,禁止访问部分敏感内容
        location ~ ^/(?:updater|ocs-provider)(?:$|/) {
                try_files $uri/ =404;index index.php;
        }
        # 添加js和css文件的缓存控制头
        location ~* \.(?:css|js)$ {
                try_files $uri /index.php$uri$is_args$args;
                add_header Cache-Control "public, max-age=7200";
                add_header Strict-Transport-Security "max-age=15768000;
                includeSubDomains;
                preload;
                ";
                add_header X-Content-Type-Options nosniff;
                add_header X-Frame-Options "SAMEORIGIN";
                add_header X-XSS-Protection "1;
                mode=block";
                add_header X-Robots-Tag none;
                add_header X-Download-Options noopen;
                add_header X-Permitted-Cross-Domain-Policies none;
                access_log off;
        }
        location ~* \.(?:svg|gif|png|html|ttf|woff|ico|jpg|jpeg)$ {
                try_files $uri /index.php$uri$is_args$args;
                access_log off;
        }
}
1.3配置php
yum install http://rpms.famillecollet.com/enterprise/remi-release-6.rpm -y


yum --enablerepo=remi-php56 install php php-fpm php-mysql php-gd php-xml php-redis php-libs php-devel php-zlib php-mbstring -y
1.3.2
修改配置文件,
vim /etc/php-fpm.conf 在[global] 上面插入 添加
user = nextcloud
group = nextcloud
listen = 127.0.0.1:9000
env[HOSTNAME] = $HOSTNAME
env[PATH] = /usr/local/bin:/usr/bin:/bin
env[TMP] = /tmp
env[TMPDIR] = /tmp
env[TEMP] = /tmp
这里先不启动nginx与php-fpm
2、安装mysql
2.1 安装教程引用:http://wangzhirui.com/2019/09/03/CentOS6-9%E6%BA%90%E7%A0%81%E5%AE%89%E8%A3%85mysql5-7-10/
2.2添加nextcloud用户 与 库nextcloud_db
CREATE DATABASE nextcloud_db;GRANT ALL ON nextcloud_db.* TO 'nextcloud'@'%' IDENTIFIED BY 'nextcloud';
FLUSH PRIVILEGES;
3、安装nextcloud
3.1.1配置hosts
192.168.15.173 iriscloud
192.168.15.173 cloud.rui.cn
3.2安装程序
3.2.1下载
wget https://download.nextcloud.com/server/releases/nextcloud-10.0.2.zip --no-check-certificate
unzip nextcloud-10.0.2.zip
3.2.2移动到数据目录下
mkdir -p /data
mv nextcloud /data/
3.2.3给nextcloud权限
mkdir -p /data/clouddisk  #这个用于上传文件的保存
chown -R nextcloud:nextcloud /data
4.1启动nginx
/usr/local/nginx/sbin/nginx4.2配置下php-fpm
vi /etc/php.inipdo_mysql.default_socket=
修改成
pdo_mysql.default_socket= /tmp/mysql.sock如果不配置php.ini里面的mysqli.default_socket和pdo_mysql.default_socket,那么他们的默认值是/tmp/mysql.sock,如果与/etc/my.cnf里面的不一致,那么会导致php无法正确连接mysql
去掉这行的释
always_populate_raw_post_data = -1官方在PHP5.6就把$HTTP_RAW_POST_DATA废弃了,而且在PHP7中把它移除了。因为这个参数影响性能,所以要废弃掉,官方建议用php://input来代替。
service php-fpm start4.3 要给这个目录权限 不然登录不了
chmod -R 777 /var/lib/php/session/5.1打开域名
配置数据库与管理员密码即可
#密码要注意复杂性

客户端
https://nextcloud.com/install/#
配置redis 增强性能
使用Redis做内存缓存可以有效提升程序运行速度。
curl -O http://download.redis.io/releases/redis-3.2.8.tar.gz解压包
tar -zxvf redis-3.2.8.tar.gz
cd redis-3.2.8/deps/
make geohash-int hiredis jemalloc linenoise lua编译安装
cd ..
make && make install
cd utils/
./install_server.sh过程如下
[root@iriscloud utils]# ./install_server.sh
Welcome to the redis service installer
This script will help you easily set up a running redis server

Please select the redis port for this instance: [6379]
Selecting default: 6379
Please select the redis config file name [/etc/redis/6379.conf]
Selected default - /etc/redis/6379.conf
Please select the redis log file name [/var/log/redis_6379.log]
Selected default - /var/log/redis_6379.log
Please select the data directory for this instance [/var/lib/redis/6379]
Selected default - /var/lib/redis/6379
Please select the redis executable path [/usr/local/bin/redis-server]
Selected config:
Port           : 6379
Config file    : /etc/redis/6379.conf
Log file       : /var/log/redis_6379.log
Data dir       : /var/lib/redis/6379
Executable     : /usr/local/bin/redis-server
Cli Executable : /usr/local/bin/redis-cli
Is this ok? Then press ENTER to go on or Ctrl-C to abort.
Copied /tmp/6379.conf => /etc/init.d/redis_6379
Installing service...
Successfully added to chkconfig!
Successfully added to runlevels 345!
Starting Redis server...
Installation successful!
[root@iriscloud utils]#
修改配置
vi /etc/redis/6379.conf 修改成如下两行
bind 127.0.0.1

requirepass foobaredrui
启动
redis-server /etc/redis/6379.conf 配置nextcloud
vi /data/nextcloud/config/config.php 在括号内添加:
  'memcache.local' => '\OC\Memcache\Redis',
  'redis' => array(
  'host' => '127.0.0.1',
  'port' => 6379,
  'password' => 'foobaredrui',
  ),
执行如果出现:
[root@iriscloud config]#  /usr/bin/php /data/nextcloud/cron.php
The posix extensions are required - see http://php.net/manual/en/book.posix.php
解决方法:
yum install -y php56-php-process.x86_64 #注意看你PHP的版本是多少的,别乱安装修改php配置文件,添加 posix.so
vi /etc/php.ini 在文件末尾添加:
extension= /opt/remi/php56/root/usr/lib64/php/modules/posix.so重启下php-fpm
/etc/init.d/php-fpm restart下列命令 如果查询有结果 说明成功了。再次执行cron.php就没有问题了。
php -m | grep posix配置定时任务,由于cron.php只允许运行程序的用户来执行 而我是使用nextcloud用户运行的程序 所以我这样写
我是在root用户下配置的定时任务
[root@iriscloud modules]# crontab -l
*/15 * * * *  su -s /bin/bash  nextcloud -c -l "/usr/bin/php /data/nextcloud/cron.php"    >/dev/null
[root@iriscloud modules]# 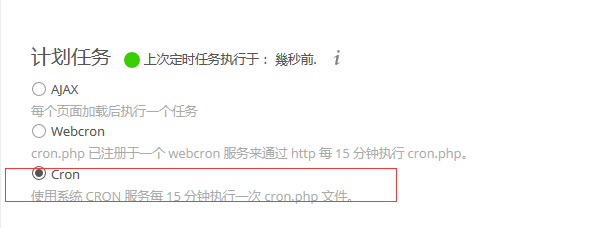
其他:
安装 LDAP user and group backend
The library ldap is not available.
1、解决方法:
yum install -y php56-php-ldap.x86_642、找到ldap.so 的路径
find / -name ldap.so3、修改php.ini 在文件最后添加如下一行:
extension= /opt/remi/php56/root/usr/lib64/php/modules/ldap.so4、重启下php-fpm
/etc/init.d/php-fpm restart转载请注明来源,欢迎对文章中的引用来源进行考证,欢迎指出任何有错误或不够清晰的表达。
文章标题:Centos6安装Nextcloud10
本文作者:wangzhirui
发布时间:2019-09-03, 16:58:05
最后更新:2025-02-27, 02:03:54
原始链接:https://wangzhirui.com/2019/09/03/Centos6安装Nextcloud10/转载请保留原文链接及作者。